
Using Projects / Tasks / Activities
5pm Basics
5pm is a tool that lets you manage your projects and tasks online and to coordinate your team's efforts.
5pm Data Structure
 |
Group | You can use Groups to group together Projects and single Tasks (tasks with no parent projects). For example, you can group projects by departments inside your company. There are no groups by default and all your projects are placed in the "All Groups" area. You can start creating groups when you have too many projects and want to start grouping them. |
 |
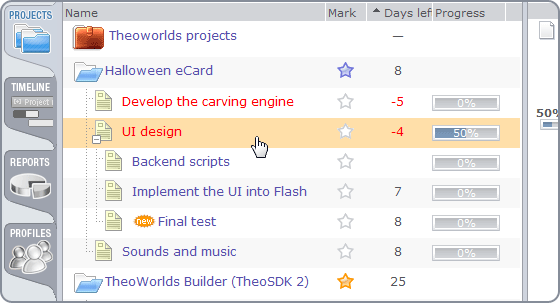
Project | Projects can contain multiple tasks that need to be completed in order to finish the project. A project can have one of these statuses: "open", "on hold" and "done". Each project can have a client attached to it and a Project Team. |
 |
Task | Tasks are normally added into projects, but you can also create tasks outside them (Single Tasks). Single Tasks can be used when you don't want a whole project created for a job. A task can have one of these statuses: "open", "on hold" and "done". Project and Task Statuses can be customized — just contact our support about it.
Each task can have a Task Team attached to it that can be different from the parent Project Team. This allows for extra flexibility. You can add to individual tasks only the sub-team needed for it, not the whole project team. You can even add to it people that are not even part of the whole project. This allows for more efficient filtering of yours or other users tasks. Also, it makes the email notifications more targeted — you can notify the whole Project Team, or just the Task Team, depending on the situation. |
 |
Message | Messages are an universal tool for exchanging ideas, comments and notes. You can add them to a Project or a Task. You can also attach files to a Message. |
 |
Progress Note | Progress Notes are a way of reporting progress and/or time for tasks (not projects). Each Progress Note may contain the description, the % of task completion (the only mandatory field) and the hours invested into it. The % is just your estimate, to communicate your team where you stand with the task. The latest one overwrites the previous ones. Adding a 100% Progress Note closes a task. |
| File (attachment) | You can add files to a Project or a Task as a way to share your documents with other users. Files can be also attached to Messages. | |
 |
Profile (user) | There are four different user profiles: Administrators, Users, External users and Clients. The first three categories can be added to a Project Team or a Task Team and they have different security levels. Clients are a separate type of users — they can be assigned to the whole project level (by adding them to the Project Team). |
User Profiles and Security Levels
You can control who can see or edit what with a combination of user security level and project/task/messages flags (like the "hide from non-team users" in projects/tasks and "hide from Clients" in messages).
Security Levels
|
Administrator | Administrators are users with unlimited rights — they can see and edit any information in your 5pm account. They can also access global 5pm settings and the subscription details. Usually they are reserved for managers in bigger teams. The first user that opens the 5pm account is its main Administrator. This main Administrator is used by us as the main point of contact for this 5pm account — make sure you use a valid email and add support@5pmweb.com to your trusted email addresses. |
 |
User | This is the most common type of users, recommended for all your team members. Their rights:
|
 |
External User | External Users are very similar to Users, but are more limited, and they can only see projects/tasks assigned to them. Basically, External Users function like Users in a scenario when ALL projects and task would be flagged as "hide from non-team users"):
|
 |
Client | Clients are different from all the other types of users. As the name suggests, they are designed for somebody to keep track of their projects, but not for the ones working on them. Clients are directly attached to whole projects (not individual tasks) and can see just those projects (and anything inside them and inside their tasks, besides the hidden messages and files) and add comments. Clients' rights:
Basically, Clients can see their projects in a read only mode, but can comment and post files. Unlike other users, Clients do not count toward your plan. You can have an infinite number of clients on any plan.
|
Working with Projects
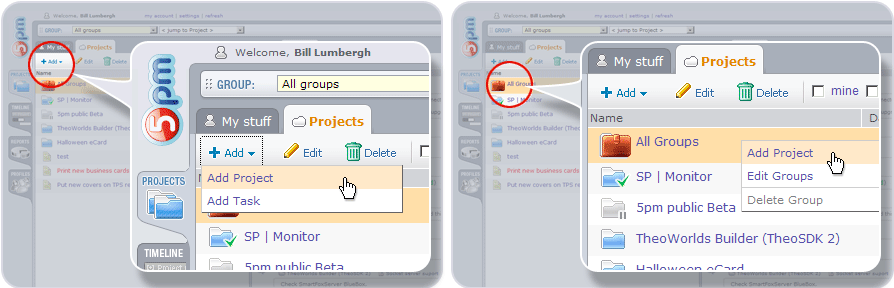
You have to be in the main view ("Projects") and the "Projects" tab has to be selected in the left panel. There are two ways to add a project:
- Click "Add" button on the top of the left panel, then select "Add Project" from the dropdown.
- RIGHT click on the Group in the left panel, then select "Add Project" from the dropdown.
| Text | Result |
|---|---|
| "tomorrow" or "tom" | selects the current day (today) |
| yesterday/yes | selects yesterday |
| "+x days", "+x day", "+x d" or just "+x" | selects a day that is x (can be any number) days from the current day for the Start Date, and x days from Start Date for Deadline field. A "-" sign instead of "+" will select prior dates.
"+" is optional. Spaces between x and the letters are optional.
|
| "+x weeks", "+x week" or "+x w" | same as with days, but applied to weeks. |
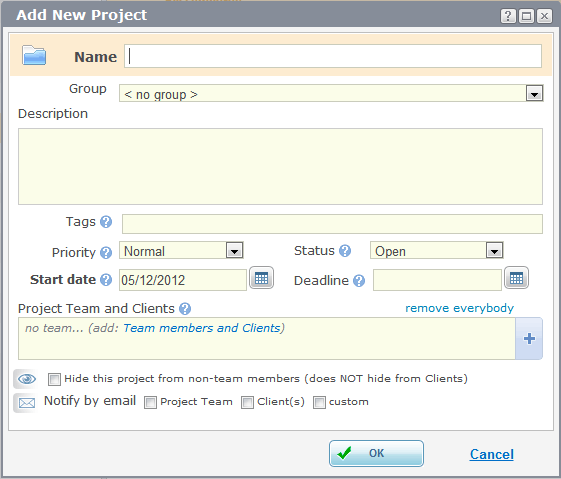
When you click "Add Project", a popup window will open, where you can define all the project's properties:
- Name — project name. This is the only one field you have to enter to create a new project.
- Group — the project can be attached to a group. The current group is pre-selected. Initially, all projects are created outside any groups ("All Groups" view).
- Description — project's description.
- Tags — custom tags (select from existing ones or add new ones on the fly).
- Priority — select: "Low", "Normal", "High" or "Urgent".
Project and Task Priorities can be customized — just contact our support about it. - Status — select: "Open" (default status), "On Hold" (temporarily stopped) or "Done" (closed).
Project and Task Statuses can be customized — just contact our support about it. - Start Date — set to "today" by default. Check Calendar text shortcuts for information on a quick way to select dates.
- Deadline — scheduled end date (empty by default)
- Project Team and Clients — assign project team members and Clients to the project. You can highlight certain team members by clicking on their names (it will bold them out).
- Hide this project from non-team member — hide this project from Users that are not part of the project's team. Note that users with Admin security level can see all the projects, including the hidden ones. The project creator can see all the projects he/she created, even hidden ones.
- Notify by Email — send email notifications.
Note: The mandatory fields are marked in bold.
There are three ways to edit a project (first two are very similar to Adding a Project):
- Select a project by clicking on it in the left panel, the click "Edit" button on the top of the left panel.
- RIGHT click on the project in the left panel, then select "Edit" from the dropdown.
- When a project is selected in the left panel, and the right panel has the Info tab selected, click the "Edit" button on the top of the right panel.
Same as "Editing a Project", except use "Delete" option/button.
Working with Tasks
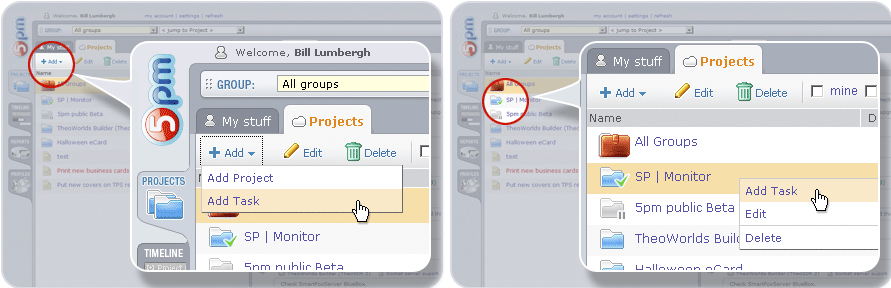
You have to be in the main view ("Projects") and the "Projects" tab has to be selected in the left panel. There are two ways to add a task:
- Click "Add" button on the top of the left panel, then select "Add Task " from the dropdown. If "My Stuff" tab is selected in the left panel, just click the "Add" button.
- RIGHT click on the Project in the left panel, then select "Add Task" from the dropdown.
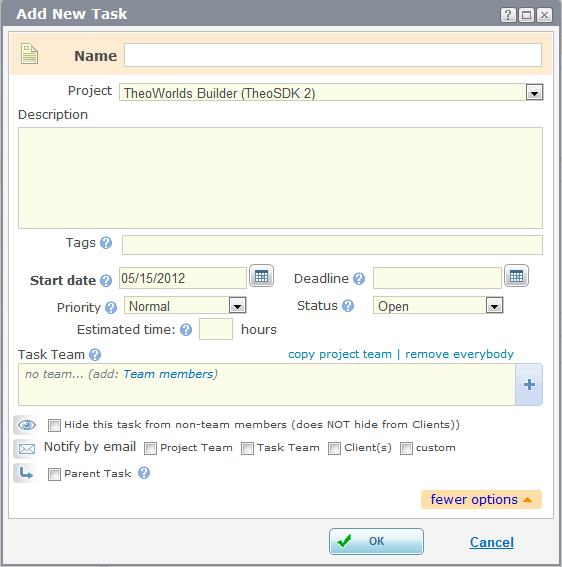
When you click "Add Task ", a popup window will open, where you can define all the task's properties:
- Name — task name. The only one field you have to enter to create a new task.
- Group — available only for Single Tasks (outside projects). The current group is pre-selected.
- Project — the task's parent project. The task may be also created outside a project (Single Task).
Single Task is a task outside a project. It can be used for small independent tasks, so you don't have to create a whole new project for it. (Example: "Backup the data").
If a project is selected in the left panel, then the Project dropdown will have that project pre-selected.
Note: When you select a parent Project, the Group dropdown disappears, since the parent project will define what group it will belong to. - Description — task description.
- Tags — add one or multiple tags from existing ones or create new ones on the fly.
- Start Date — is set to "today" by default. Check Calendar text shortcuts for information on a quick way to select dates.
- Deadline — scheduled end date (empty by default)
- Priority — options: "Low", "Normal" (default), "High" or "Urgent". Visible only when "more options" is clicked at the bottom.
- Status — options: "Open" (default), "On Hold" (temporary stopped) or "Done" (closed). Visible only when "more options" is clicked at the bottom.
- Estimated time — estimated time it would take to complete the task in hours. Visible only when "more options" is clicked at the bottom.
- Task Team — add users to the task team. If the task has a parent project, you can use the "copy Project Team" link to add the parent project team members to the task team.
- Hide this task from non-team members — hides the task from users that are not part of the task's team. Note that users with Admin security level can see all the tasks, including the hidden ones. The task creator can see all the tasks he created, even hidden ones.
- Notify by email — sends email notifications.
Note: The mandatory fields are marked in bold.
There are three ways to edit a Task (first two are very similar to Adding a Task ) :
- Select a task by clicking on it in the left panel, the click "Edit" button on the top of the left panel.
- RIGHT click on the task in the left panel, then select "Edit" from the dropdown.
- When a task is selected in the left panel, and the right panel is on Info tab, click the "Edit" button on the top of the right panel.
Same as "Editing a Task", except use "Delete" option/button.
Working with Messages/Files/Progress Notes
You have to be in the main view ("Projects") and the "Activity" tab has to be selected in the right panel (or the "Files" tab can be also selected for the Files).
The right panel is where you can see all the Activity related to the projects and tasks selected in the left panel:
- Messages — comments you can post to a Project or Task for your team.
- Files — you can also attach files to Projects and Tasks. Since you can add notes to attached files, and attach files to messages, Files are very similar to Messages.
- Progress Notes — special comments that are used to report progress and time spent for a tasks. Progress Notes can be added to Tasks only.
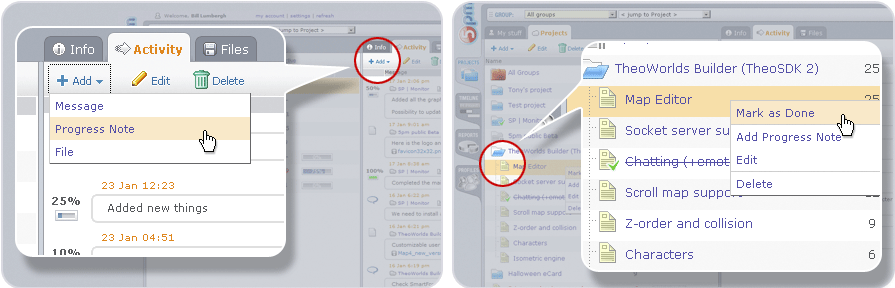
To add a Message/File:
- A Project or a Task has to be selected in the left panel. Click "Add" button on the top of the right panel, then select "Message/File" from the dropdown.
In order to add a Progress Note, a Task must be selected in the left panel. You can add it the same way you add a Message/File, plus there are two additional ways to do it through the Task's contextual menu: - RIGHT click on the Task in the left panel, then select "Add Progress Note " from the dropdown.
- RIGHT click on the Task in the left panel, then select "Mark as Done/Unmark as Done" from the dropdown. If a Task is not closed yet, you can quickly close it by selecting "Mask as Done" — it will add a 100% Progress Note to the Task and will change its status to "Done". This action can be reversed with "Unmark as Done" — it will delete the last 100% Progress Note that closed the Task.
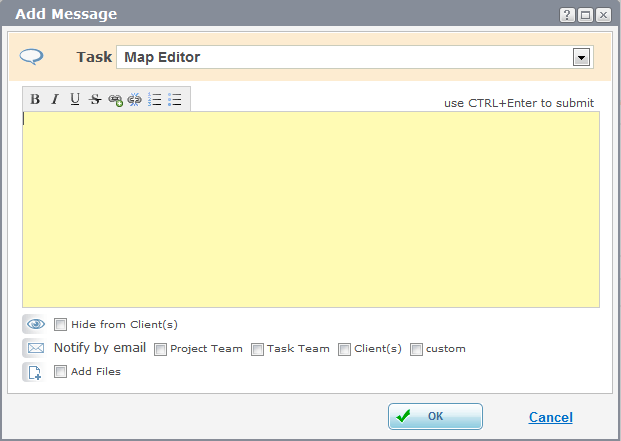
"Add Message" window fields:
- Task — the task to which the Message will belong (the Task selected in the left panel will be pre-selected in this dropdown). You can also select " no task (add to the whole project) " to add the Message to the parent Project.
- Content — the message body.
- Hide from Client(s) — hides this messages from clients assigned to the parent project.
- Notify by email — sends email notifications.
- Add Files — opens additional fields for attaching files to the Message.
Note: The mandatory fields are marked in bold.
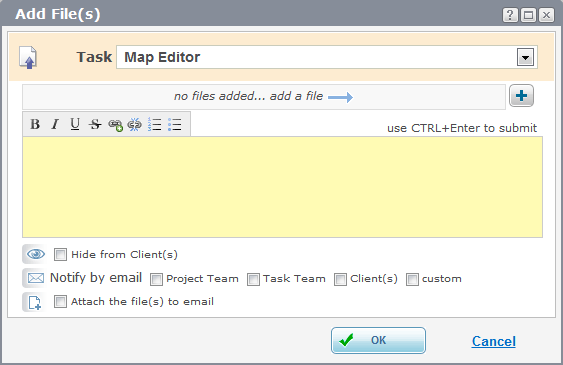
"Add Files" works very similar to "Add Message", except:
- The section for attaching files is on the top of the window.
- Description field is non-mandatory, but you have to select at least one file.
Besides the Activity tab in the right panel, there is a tab called "Files". This is where you can see all the files in a separate view that is designed to present the files in a compressed list. You can easily browser through all the Group, Project or Task files, depending what is selected in the left panel.
You can operate with Files in this view the same you operate with them in the Activity tab.

"Add Progress Note " works very similar to "Add Message", since a Progress Note is like a Message that also contains information about the work done on a Task. The additional fields containing this information are:
- Date — you can post it on another day, to report progress from the past, for example.
- % complete — shows the percentage of the Task completed. Note that the Progress Notes percentages are not cumulative, and just the last one defines the current task percentage (for example: if you add two Progress Notes, one with 10% and another with 30%, the Task completion progress becomes 30%, and not 40%).
- Time spent — you can also report the time spent on a Task (in hours, so 1.5 hours will be 1 hour and 30 mins). Note that this field is not mandatory. In order to see all the time spent on a Task, add the Hours column to the left panel or check the Reports.
There are two ways to edit a Message/File/Progress Note :
- Using the menu on the top of the panel — just select a Message/File/Progress Note in the right panel, and then click the "Edit" button on the top of it.
- Using the contextual menu — just RIGHT click on the Message/File/Progress Note in the right panel, hen select "Edit" from the dropdown.
Same as "Editing a Message/File/Progress Note", except use "Delete".
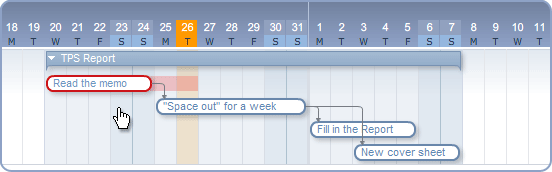
Sub-tasks (Task Dependencies)
To link one task to another (and create sub-tasks) do one of the following:
- Select a task in the left panel and then click Add>Add Sub-task on the top (or through the right click on any task).
- In the task creating/editing popup window click the "Parent Task" checkbox and then select the parent task from the dropdown.
- Drag one task into another — this is the fastest way.
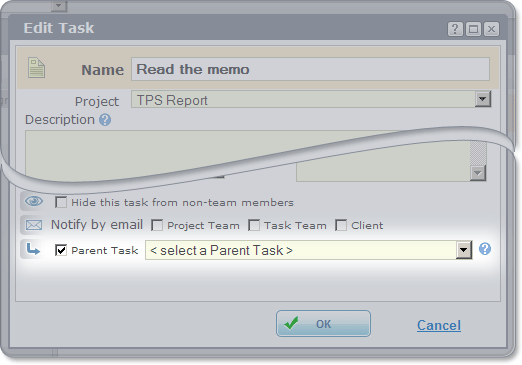
The parent task (if any) for each task is displayed in its "Info" tab in the right panel.
One parent task can have multiple dependent tasks. One dependent task can have just one parent task.
Since the dependent tasks can start before or after the parent task End Date (Deadline), you can create flexible schedules, with dependent tasks starting before the parent task is completed (ex: work can be started on "Website copy update" task, while "Translations" task is not finished yet) or some time after the parent task was completed (ex: "Paint the wall" needs to start some time after the "Apply primer" task was completed). This is sometimes called "lag" and "lead".
The relationship between dependent task Start Date and its parent task End Date (Deadline) is maintained automatically when the parent End Date changes — to keep the same distance between the dates. Changing the dependent task Start Date does not change the parent task Deadline.
This feature can be disabled on your request — just contact our support.
In the main view the dependent tasks are grouped under their parent tasks and this grouping is maintained despite the sort order. When the parent task is not present on the screen (hidden for some reason), its sub-tasks are displayed as if they do not have a parent task.
The Timeline view makes it easy to see all the task dependencies. Moving or resizing the parent tasks in the Timeline will also move the dependent tasks, making re-scheduling a breeze:
The tasks connections will be automatically broken when:
- Moving one task from one project to another (or in and out a project for single tasks) since tasks can not be linked across projects.
- Changing the start dates so the dependent task Start Date becomes older than the parent task Start Date (should not usually happen). One of the scenario when this can happen is when some of the connected tasks can not be edited by the user (the User is not-part of the Task team), while other connected tasks can — dragging the "unlocked" tasks in the Timeline may brake the connections with the locked ones, if the connections can not be maintained (Start Date of a dependent task becomes older than the start date of its parent task).